

Getting Docker running on Windows 10
Just a quick post about a couple things I’ve learned yesterday and today.
Docker is now available to run on Windows 10. I’m not going to go into the details as they are better covered in other posts, but I’ll share the steps I followed to get Docker running on my Windows 10 laptop.

Visit David Wesst’s Blog post (cross-posted to Western Devs)
Dave was the first of the Western Dev guys to talk about trying to get Docker working on Windows 10. He blogged about his adventure and that is where I started.
http://blog.davidwesst.com/2015/08/Docker-on-Windows-10-Problems/
http://www.westerndevs.com/docker-on-windows-10-problems/
Visit the Docker GitHub site
Dave’s post directed me towards a couple other places. Namely, the Docker issues GitHub site and the Docker windows installation page.
https://docs.docker.com/installation/windows/
This was pretty important because it was where the conversation about getting Docker (more accurately, VirtualBox) running on Windows 10. There is an issue in VirtualBox (current stable build) that does not allow it to work on Windows 10. This issue has been resolved in a Test build. The link to the test build is here.
https://www.virtualbox.org/wiki/Testbuilds
I didn’t actually need to go to the VirtualBox website to get the build because the latest test version of the Docker for Windows installer has the test version of VirtualBox already inside of it. You can find the link to the current test installer here.
https://github.com/docker/toolbox/issues/77
Follow the start up direction
The next thing I did was follow all of the start-up directions from the docker windows install documents. VirtualBox was installed, all of the Docker Toolbox items where installed, and so I fired it all up. And it didn’t work. What was going on? The VM very quickly informed me that it couldn’t find a 64bit cpu/os which is required to run docker.
This kernel requires an x86-64 CPU, but only detected an i686 CPU. Unable to boot – please use a kernel appropriate for your CPU
Well, that was weird. I have an modern laptop (Dell XPS 15) running 64 bit Windows 10 Enterprise. What could be the problem? Google Foo to the rescue!
First I found posts suggesting that the CPU Intel Virtualization Technologies were not enabled. I didn’t think that was true because I had already been running some HyperV machines on my laptop, but I did re-boot into my BIOS and ensure that Intel VT-x/AMD-V where enabled. They were.
So google a bit more, and I find that Virtual Box might need me to change the “type” of the VM to “Other” and the OS to “Other/64bit” or something like that. But interestingly enough, those were not options that I had in the VM.
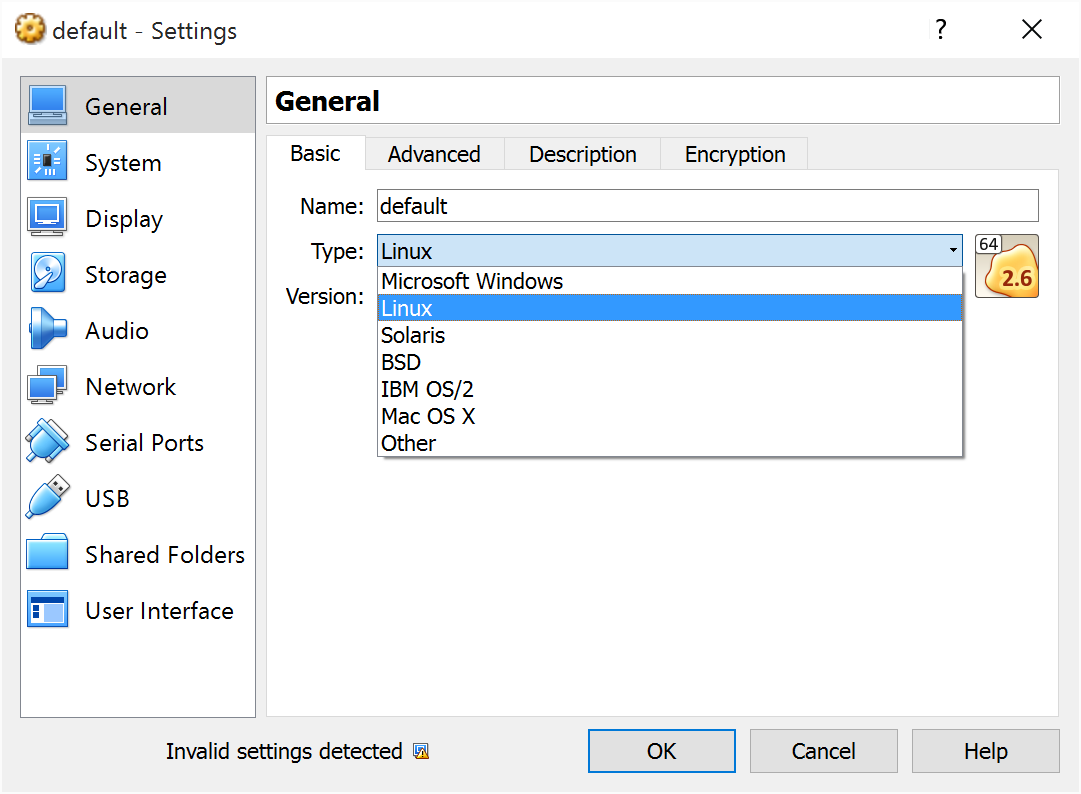
This screenshot was taken after the fix (which I’m getting to) but originally, none of the 64 bit versions of the OSes were available as a choice.

One last thing I found was to remove the HyperV feature from Windows 10, but that wasn’t a viable option for me. I have some HyperV virtual machines that I run (and need to run) so I didn’t even explore that option.
At this point, I worked around for a bit and then gave up for the evening. Better to sleep on it and see if I could start fresh in the morning.
Scott Hanselman to the Rescue
I’m not sure what search I did in the morning that got me to Scott Hanselman’s post. I should really just always go there first because I find so much good information about Windows development (native and cross-platform) there. But specifically, it was this post that finally solved my problem.
I didn’t know this until today, but as it turns out, HyperV and VirtualBox will not run together side-by-side in 64 bit modes. And Scott’s blog post about rebooting to a hypervisorlaunchtype off mode of Windows 8.1 worked flawlessly for Windows 10. So I didn’t have to un-install the HyperV feature, but as it turns out, I did have to disable HyperV. I’m sure glad I don’t have to add/remove it daily though!
Final Thoughts
So that was it! Thanks to David Wesst, WesternDevs, Docker and Scott Hanselman, I now have Docker running on my Windows 10 laptop. Just not at the same time as my HyperV virtual machines. 😀
Using PowerShell to Set Your Azure SQL firewall rule
If you’ve read a couple of my recent blog posts, you’ll see that I’ve been working in PowerShell a lot lately. I’ve also been working with Azure a lot lately as well and I’m getting opportunities to put those two things together.
Since my laptop is moving around a lot and occasionally my home IP address changes, I do need to update my Azure SQL Firewall rule to allow my computer at my current IP address to talk to my Azure SQL database server.
I’ve added 4 simple functions to my .\profile.ps1 script that makes this job really easy.
function Set-MyAzureFirewallRule {
    $response = Invoke-WebRequest ifconfig.me/ip
    $ip = $response.Content.Trim()
    New-AzureSqlDatabaseServerFirewallRule -StartIPAddress $ip -EndIPAddress $ip -RuleName <Name of Rule> -ServerName <your database server name here>
}
function Update-MyAzureFirewallRule{
    $response = Invoke-WebRequest ifconfig.me/ip
    $ip = $response.Content.Trim()
    Set-AzureSqlDatabaseServerFirewallRule -StartIPAddress $ip -EndIPAddress $ip -RuleName <Name of Rule> -ServerName <your database server name here>
}
function Remove-MyAzureFirewallRule{
    Remove-AzureSqlDatabaseServerFirewallRule -RuleName <Name of Rule> -ServerName <your database server name here>
}
function Get-MyAzureFirewallRule{
    Get-AzureSqlDatabaseServerFirewallRule -RuleName <Name of Rule> -ServerName <your database server name here>
}
Get the Azure PowerShell Module
The first thing you’ll need to do if you want to do any work with Azure via PowerShell is download and install the Azure PowerShell modules.
Install And Configure Azure PowerShell
Once you’ve done this, you’ll be able to run Azure CommandLets in your PowerShell session.
How to get your IP address
Since many times I’m behind a router that is doing NAT translations, knowing my IP address isn’t as simple as typing Get-NetIPAddress | Format-Table or ipconfig in a console. That will tell me what my computer thinks the IP address is in my local network, but that isn’t what Azure will see. Azure will see the IP address of my cable modem.
In order to find out what my IP address is from an external perspective, I need the help of a little service called ifconfig.me tell me what my IP address is externally. If you make the whole Url ifconfig.me/ip you will get a simple text response from them with your IP address. Just give that Url a click and try it out. If you view the page source, you’ll see that only text was returned.
Putting it all together
So now we have the Azure PowerShell modules and we know about ifconfig.me. All we need now is the put the two together into one of our functions. I’ll use my first function as the example. You’ll be able to follow the rest after I describe this one.
function Set-MyAzureFirewallRule {
    $response = Invoke-WebRequest ifconfig.me/ip
    $ip = $response.Content.Trim()
    New-AzureSqlDatabaseServerFirewallRule -StartIPAddress $ip -EndIPAddress $ip -RuleName <Name of Rule> -ServerName <your database server name here>
}
The first line is the PowerShell (non-Azure) CmdLet Invoke-WebRequest ifconfig.me/ip. This will call ifconfig.me/ip and get a response, trapped in the $response variable.
In the next line, I clean up the response a little bit using some .Net string functions to move my IP address into the $ip variable.
Finally, I call the Azure PowerShell CmdLet to create a new Firewall rule in my Azure account.
You will have to have followed the instructions in Azure PowerShell Install and Configure to set up the authentication to allow this PowerShell session to access your Azure subscription.
The other three variations of this function are for completeness. You will actually probably use the Update-MyAzureFirewallRule most since you’ll set-up the Firewall rule once the first time and then you’ll just need to update it whenever your IP address changes.
Final Thoughts
I hope this post makes it easier for you to access your SQL Azure database server from your laptop, where ever it may have moved. Once you’ve set up the rule, you’ll be able to access your database server from the tools in Visual Studio, SQL Server Management Studio, or any other tool you prefer to use to work with your Azure SQL Server.
Enjoy!!
Building a TFS 2015 PowerShell Module using Nuget
Update: Unwittingly, I hadn’t tested my Nuget approach on a server with no Visual Studio or TFS installations on it and I’ve missed a couple assemblies that are required when loading the TFS Object model. I’ve updated the line of code in my samples, but just in case, here is the new version of the line in question.
$net45Dlls = $allDlls | ? {$_.PSPath.Contains("portable") -ne $true } | ? {$_.PSPath.Contains("resources") -ne $true } | ? { ($_.PSPath.Contains("net45") -eq $true) -or ($_.PSPath.Contains("native") -eq $true) -or ($_.PSPath.Contains("Microsoft.ServiceBus") -eq $true) }
The update is the addition of two -or statements to the last inclusive where clause.
I’ve also slightly changed the Import-TfsAssemblies function to include a try/catch block for better error reporting.
Original Start
With the release of Visual Studio 2015 on July 20, 2015, we can talk about and explore a lot of really cool things that are happening with Visual Studio (VS) and Team Foundation Server (TFS). One of the things that has been a bit of a pain when managing a TFS on-premises installation has been the necessity of installing Visual Studio to get the TFS client object model on your administrative workstation. With the explosive use of PowerShell to manage all things Microsoft, this has been a bit of a drag on using PowerShell for TFS work. There are PowerShell modules for TFS in the TFS Power Tools, but sometimes you need the power that comes with using the TFS Object Model. Which meant that you had to install Visual Studio. I’m really glad to say that is no longer the case. With the release of TFS 2015, the TFS Object Model is now available on Nuget! With our trusty nuget.exe, we can now get the TFS object model from a trusted source, without violating any license terms, to use in our own TFS PowerShell modules. I’m not going to profess to be a PowerShell wizard so I hope I’m not breaking any community best practices too badly. I’m more than happy to adapt my implementation if I get feedback on better ways of doing things! It should also be noted that I’m using PowerShell 4. This is located in the Windows Managment Framework 4 download (http://www.microsoft.com/en-ca/download/details.aspx?id=40855), a free download from Microsoft. I don’t think you’ll have any problems upgrading from previous versions of PowerShell but I’m not going to any assurances. Let’s start walking through building a TFS PowerShell module!
Create A PowerShell Module
I’m not going to go into a lot of details, but the basic steps to creating your PowerShell module are:
- Navigate to %USERPROFILE%\My Documents\WindowsPowerShell\Modules
- Create a folder called MyTfsModule
- In the MyTfsFolder, create a file called MyTfsModule.psm1
It is important that the name of the Module folder and the Module file are the same. Otherwise, you won’t be able to load your module. This one requirement tripped me up for a while when I started writing PowerShell modules.
Module-Specific Variables And Helper Functions
There are a few module specific variables that we need to set when the module loads and a Helper function that I use for getting/creating folders. You can put these at the top of your MyTfsModule.psm1 file.
Write-Host "Loading MyTfsModule"
#Module location folder
$ModuleRoot = Split-Path -Parent -Path $MyInvocation.MyCommand.Definition
#where to put TFS Client OM files
$omBinFolder = $("$ModuleRoot\TFSOM\bin\")

# TFS Object Model Assembly Names
$vsCommon = "Microsoft.VisualStudio.Services.Common"
$commonName = "Microsoft.TeamFoundation.Common"
$clientName = "Microsoft.TeamFoundation.Client"
$VCClientName = "Microsoft.TeamFoundation.VersionControl.Client"
$WITClientName = "Microsoft.TeamFoundation.WorkItemTracking.Client"
$BuildClientName = "Microsoft.TeamFoundation.Build.Client"
$BuildCommonName = "Microsoft.TeamFoundation.Build.Common"

function New-Folder() {
    <# .SYNOPSIS This function creates new folders .DESCRIPTION This function will create a new folder if required or return a reference to the folder that was requested to be created if it already exists. .EXAMPLE New-Folder "C:\Temp\MyNewFolder\" .PARAMETER folderPath String representation of the folder path requested #>

     [CmdLetBinding()]
     param(
         [parameter(Mandatory=$true, ValueFromPipeline=$true)]
         [string]$folderPath
     )
    begin {}
    process {
        if (!(Test-Path -Path $folderPath)){
            New-Item -ItemType directory -Path $folderPath
        } else {
            Get-Item -Path $folderPath
        }
    }
    end {}
} #end Function New-Directory
First We Get Nuget
The first thing we need to do is get the Nuget.exe from the web. This is very easily down with the following PowerShell function
function Get-Nuget(){
    <# .SYNOPSIS This function gets Nuget.exe from the web .DESCRIPTION This function gets nuget.exe from the web and stores it somewhere relative to the module folder location #>
    [CmdLetBinding()]
    param()

    begin{}
    process
    {
        #where to get Nuget.exe from
        $sourceNugetExe = "http://nuget.org/nuget.exe"

        #where to save Nuget.exe too
        $targetNugetFolder = New-Folder $("$ModuleRoot\Nuget")
        $targetNugetExe = $("$ModuleRoot\Nuget\nuget.exe")

        try
        {
            # check if we have gotten nuget before
            $nugetExe = $targetNugetFolder.GetFiles() | ? {$_.Name -eq "nuget.exe"}
            if ($nugetExe -eq $null){
                #Get Nuget from a well known location on the web
                Invoke-WebRequest $sourceNugetExe -OutFile $targetNugetExe
            }
        }
        catch [Exception]
        {
            echo $_.Exception | format-list -force
        }

        #set an alias so we can use nuget syntactically the way we normally would
        Set-Alias nuget $targetNugetExe -Scope Global -Verbose
    }
    end{}
}
Ok! When this function is invoked, we should now see a nuget.exe appear at:
%USERPROFILE%\My Documents\WindowsPowerShell\Modules\MyTfsModule\Nuget\Nuget.exe
Using Nuget to get TFS Client Object Model
Now that we have nuget, we need to get the TFS Client Object model from nuget.
function Get-TfsAssembliesFromNuget(){
    <# .SYNOPSIS This function gets all of the TFS Object Model assemblies from nuget .DESCRIPTION This function gets all of the TFS Object Model assemblies from nuget and then creates a bin folder of all of the net45 assemblies so that they can be referenced easily and loaded as necessary #>
    [CmdletBinding()]
    param()

    begin{}
    process{
        #clear out bin folder
        $targetOMbinFolder = New-Folder $omBinFolder
        Remove-Item $targetOMbinFolder -Force -Recurse
        $targetOMbinFolder = New-Folder $omBinFolder
        $targetOMFolder = New-Folder $("$ModuleRoot\TFSOM\")

        #get all of the TFS 2015 Object Model packages from nuget
        nuget install "Microsoft.TeamFoundationServer.Client" -OutputDirectory $targetOMFolder -ExcludeVersion -NonInteractive
        nuget install "Microsoft.TeamFoundationServer.ExtendedClient" -OutputDirectory $targetOMFolder -ExcludeVersion -NonInteractive
        nuget install "Microsoft.VisualStudio.Services.Client" -OutputDirectory $targetOMFolder -ExcludeVersion -NonInteractive
        nuget install "Microsoft.VisualStudio.Services.InteractiveClient" -OutputDirectory $targetOMFolder -ExcludeVersion -NonInteractive

        #Copy all of the required .dlls out of the nuget folder structure
        #to a bin folder so we can reference them easily and they are co-located
        #so that they can find each other as necessary when loading
        $allDlls = Get-ChildItem -Path $("$ModuleRoot\TFSOM\") -Recurse -File -Filter "*.dll"

        # Create list of all the required .dlls
        #exclude portable dlls
        $requiredDlls = $allDlls | ? {$_.PSPath.Contains("portable") -ne $true }
        #exclude resource dlls
        $requiredDlls = $requiredDlls | ? {$_.PSPath.Contains("resources") -ne $true }
        #include net45, native, and Microsoft.ServiceBus.dll
        $requiredDlls = $requiredDlls | ? { ($_.PSPath.Contains("net45") -eq $true) -or ($_.PSPath.Contains("native") -eq $true) -or ($_.PSPath.Contains("Microsoft.ServiceBus") -eq $true) }
        #copy them all to a bin folder
        $requiredDlls | % { Copy-Item -Path $_.Fullname -Destination $targetOMBinFolder}
    }
    end{}
}
This function does a could things. First it cleans out the existing bin folder, if it exists. Then it goes to nuget to get all of the packages that are available there. They are:
- http://www.nuget.org/packages/Microsoft.VisualStudio.Services.Client/
- http://www.nuget.org/packages/Microsoft.VisualStudio.Services.InteractiveClient/
- http://www.nuget.org/packages/Microsoft.TeamFoundationServer.Client/
- http://www.nuget.org/packages/Microsoft.TeamFoundationServer.ExtendedClient/
I use a number of switches on my invocation of the nuget.exe.
- -OutputDirectory – This sets the output directory for the nuget activities
- -ExcludeVersion – This tells Nuget not to append version numbers to package folders
- -NonInteractive – Don’t prompt me for anything
The next part seems a bit verbose, but I’m leaving it that way as an example of achieving my intent in case you want to achieve something else. I am intending to get all of the net45, non-portable, base language (non-resource) assemblies from the directory structure that is created by nuget when getting the packages. In order to do that I:
- Find all .dll files in the directory structure, recursively
- Exclude .dll files that have “portable” in their path
- Exclude .dll files that have “resource” in their path
- Include only .dll files that have “net45” in their path
After I’ve narrowed it down to that list of .dll files, I copy them all to the TFSOM\bin folder where they will be referenced from. This also allows them to satisfy their dependencies on each other as required when loaded.
Loading the TFS Object Models Assemblies
Now that we’ve retrieved the TFS Object model, and tucked it away in a bin folder we can find, we are now ready to load these assemblies into the PowerShell session that this module is in.
function Import-TFSAssemblies() {
    <# .SYNOPSIS This function imports TFS Object Model assemblies into the PowerShell session .DESCRIPTION After the TFS 2015 Object Model has been retrieved from Nuget using Get-TfsAssembliesFromNuget function, this function will import the necessary (given current functions) assemblies into the PowerShell session #>
    [CmdLetBinding()]
    param()

    begin{}
    process
    {
        $omBinFolder = $("$ModuleRoot\TFSOM\bin\");
        $targetOMbinFolder = New-Folder $omBinFolder;

        try {
            Add-Type -LiteralPath $($targetOMbinFolder.PSPath + $vsCommon + ".dll")
            Add-Type -LiteralPath $($targetOMbinFolder.PSPath + $commonName + ".dll")
            Add-Type -LiteralPath $($targetOMbinFolder.PSPath + $clientName + ".dll")
            Add-Type -LiteralPath $($targetOMbinFolder.PSPath + $VCClientName + ".dll")
            Add-Type -LiteralPath $($targetOMbinFolder.PSPath + $WITClientName + ".dll")
            Add-Type -LiteralPath $($targetOMbinFolder.PSPath + $BuildClientName + ".dll")
            Add-Type -LiteralPath $($targetOMbinFolder.PSPath + $BuildCommonName + ".dll")
        }
        catch {
            $_.Exception.LoaderExceptions | % { $_.Message }
        }
     }
     end{}
}
Putting the Object Model to Use
Now that we have the TFS Object Model loaded into this PowerShell session, we can use it! I’m going to show three functions. One that gets the TfsConfigurationServer object (basically your connection to the TFS server), one that gets the TeamProjectCollection Ids and a function that will get a list of all TFS Event Subscriptions on the server.
Get-TfsConfigServer
function Get-TfsConfigServer() {
    <#
    .SYNOPSIS
    Get a Team Foundation Server (TFS) Configuration Server object
    .DESCRIPTION
    The TFS Configuration Server is used for basic authentication and represents
    a connection to the server that is running Team Foundation Server.
    .EXAMPLE
    Get-TfsConfigServer "<Url to TFS>"
    .EXAMPLE
    Get-TfsConfigServer "http://localhost:8080/tfs"
    .EXAMPLE
    gtfs "http://localhost:8080/tfs"
    .PARAMETER url
     The Url of the TFS server that you'd like to access
    #>
    [CmdletBinding()]
    param(
        [parameter(Mandatory = $true)]
        [string]$url
    )
    begin {
        Write-Verbose "Loading TFS OM Assemblies for 2015 (14.83.0)"
        Import-TFSAssemblies
    }
    process {
        $retVal = [Microsoft.TeamFoundation.Client.TfsConfigurationServerFactory]::GetConfigurationServer($url)
        [void]$retVal.Authenticate()
        if(!$retVal.HasAuthenticated)
        {
            Write-Host "Not Authenticated"
            Write-Output $null;
        } else {
            Write-Host "Authenticated"
            Write-Output $retVal;
        }
    }
    end {
        Write-Verbose "ConfigurationServer object created."
    }
} #end Function Get-TfsConfigServer
This function takes a Url and returns an instance of a Microsoft.TeamFoundation.Client.TfsConfigurationServer. This connection object will be authenticated (via Windows Integrated Authentication). If you don’t have permission within the domain to administer the TFS server, you won’t be able to use the functions provided by the object model. The other functions require this connection in order to do their additional work.
Get-TfsProjectCollections
function Get-TfsTeamProjectCollectionIds() {
    <# .SYNOPSIS Get a collection of Team Project Collection (TPC) Id .DESCRIPTION Get a collection of Team Project Collection (TPC) Id from the server provided .EXAMPLE Get-TfsTeamProjectCollectionIds $configServer .EXAMPLE Get-TfsConfigServer "http://localhost:8080/tfs" | Get-TfsTeamProjectCollectionIds .PARAMETER configServer The TfsConfigurationServer object that represents a connection to TFS server that you'd like to access #>
    [CmdLetBinding()]
    param(
        [parameter(Mandatory = $true, ValueFromPipeline = $true)]
        [Microsoft.TeamFoundation.Client.TfsConfigurationServer]$configServer
    )
    begin{}
    process{
        # Get a list of TeamProjectCollections
        [guid[]]$types = [guid][Microsoft.TeamFoundation.Framework.Common.CatalogResourceTypes]::ProjectCollection
        $options = [Microsoft.TeamFoundation.Framework.Common.CatalogQueryOptions]::None
        $configServer.CatalogNode.QueryChildren( $types, $false, $options) | % { $_.Resource.Properties["InstanceId"]}
    }
    end{}
} #end Function Get-TfsTeamProjectCollectionIds
Get-TfsEventSubscriptions
We are using a 3rd party tool that subscribes to build events and we needed to know if it was releasing those subscriptions properly and also discover where this tool was running. We thought that the easiest way to do this was to look at all of the subscriptions in the TFS Project Collections in our AppTier.
#adapted from http://blogs.msdn.com/b/alming/archive/2013/05/06/finding-subscriptions-in-tfs-2012-using-powershell.aspx
function Get-TFSEventSubscriptions() {

    [CmdLetBinding()]
    param(
        [parameter(Mandatory = $true)]
        [Microsoft.TeamFoundation.Client.TfsConfigurationServer]$configServer
    )

    begin{}
    process{
        $tpcIds = Get-TfsTeamProjectCollectionIds $configServer
        foreach($tpcId in $tpcIds)
        {
            #Get TPC instance
            $tpc = $configServer.GetTeamProjectCollection($tpcId)
            #TFS Services to be used
            $eventService = $tpc.GetService("Microsoft.TeamFoundation.Framework.Client.IEventService")
            $identityService = $tpc.GetService("Microsoft.TeamFoundation.Framework.Client.IIdentityManagementService")

            foreach ($sub in $eventService.GetAllEventSubscriptions())
            {
                #First resolve the subscriber ID
                $tfsId = $identityService.ReadIdentity(
                    [Microsoft.TeamFoundation.Framework.Common.IdentitySearchFactor]::Identifier,
                    $sub.Subscriber,
                    [Microsoft.TeamFoundation.Framework.Common.MembershipQuery]::None,
                    [Microsoft.TeamFoundation.Framework.Common.ReadIdentityOptions]::None )

                if ($tfsId.UniqueName)
                {
                    $subscriberId = $tfsId.UniqueName
                }
                else
                {
                    $subscriberId = $tfsId.DisplayName
                }

                #then create custom PSObject
                $subPSObj = New-Object PSObject -Property @{
                    AppTier = $tpc.Uri
                    ID = $sub.ID
                    Device = $sub.Device
                    Condition = $sub.ConditionString
                    EventType = $sub.EventType
                    Address = $sub.DeliveryPreference.Address
                    Schedule = $sub.DeliveryPreference.Schedule
                    DeliveryType = $sub.DeliveryPreference.Type
                    SubscriberName = $subscriberId
                    Tag = $sub.Tag
               }

               #Send object to the pipeline. You could store it on an Arraylist, but that just
               #consumes more memory
               $subPSObj

               #This is another variation where we just add a property to the existing Subscription object
               #this might be desirable since it will keep the other members
               #Add-Member -InputObject $sub -NotePropertyName SubscriberName -NotePropertyValue $subscriberId
           }
       }
   }
   end{}
}
All Done
We are now all done creating our initial MyTfsModule implementation! We should be able to load it up now and give it a spin!  I’ve obscured the name of my running module and TFS server, but in those spots, just use the name of your module and TFS server.
Import-Module MyTfsModule
$configServer = Get-TfsConfigServer http://<name of your TFS server>:8080/tfs
$allEventsOnServer = Get-TfsEventSubscriptions $configServer
$allEventsOnServer.Length
Final Thoughts
The key takeaway from this post was that it is great that we can now get the TFS Object Model from Nuget. Still a bit of a pain to sort and move the downloaded assemblies around, but this is because we I am using PowerShell and not building some sort of C#-based project in Visual Studio which would handle the nuget packages much more elegantly. I hope this post gives you the information you need to go off and create your own TFS PowerShell module without having to install Visual Studio first! p.s. I do have a version of this module that loads the assemblies from the install location of Visual Studio. I’ll visit that shortly in another blog post.
Using IE Automation in PowerShell to Simplify Browser Based Tasks
As a consultant, one of the things that I need to do regularly is log into my client’s WiFi networks. Sometimes this is a once per month task, sometimes it is a daily task. It was a daily version of this task that made me look into doing this a bit quicker. Opening Internet Explorer (or any browser) and then navigating to the page, typing in all of my credentials, and then submitting the request is a fairly monotonous task, and it isn’t very quick.
Now a days, I almost always have a PowerShell window open, and because of another little experiment I did with PowerShell and IE, I thought it should be easy to automate my WiFi network login. So I that is what I set out to do.
The way that I’m currently working in PowerShell is to create a .ps1 file to do my development in. That way I can version control the file, and keep it separate from other things that are working or in progress. So in this case, I made a PowerShell script file called Login-GuestWifi.ps1. In this file, I just started typing lines of PowerShell script and eventually I would move it into a CmdLet or a function somewhere else.
The first line in the PowerShell script is a call to create an Internet Explorer Application.
$ie = new-object -ComObject "InternetExplorer.Application"
Now that you’ve got IE in your PowerShell code, you need to figure out what to do with this. This is going to require a little bit of work in the browser so you’re going to have to open a browser and navigate to the page you’re going to be working with. In my case, this was an internal IP address that I was re-directed to when using the browser for the first time on the guest WiFi network.
http://10.10.10.10/guest/wifi-guest.php <– Example URL

Once I’ve navigated there, I press F12 to get to the developer tools of my browser. (I’ll use IE for my examples)

Using the Dev Tools, I’m going to discover what the fields I need to fill in are (their id or class). In this case, I found fragments of ids that were not generated. I took those fragments and put them into my PowerShell code along with URL of the login page.
$requestUri = http://10.10.10.10/guest/wifi-guest.php
$userIdFragment = "weblogin_user";
$passwordIdFragment = "weblogin_password";
$acceptTermsInputFragment = "weblogin_visitor_accept_terms"
$buttonIdFragment = "weblogin_submit";
I now have details of where to go and ability to find the elements on the page that I’m interested in. I’m going to now invoke some methods on the IE Application instance I have to navigate to the Url.
#$ie.visible = $true
$ie.silent = $true
$ie.navigate($requestUri)
while($ie.Busy) { Start-Sleep -Milliseconds 100 }
The first two lines indicate how IE is supposed to behave in two ways and the first one is commented out.
- Show the instance of IE. With this line commented out, we get a “headless” browsing experience with no visible window or rendering. Visible Property – MSDN
- Do not show any dialogs that may pop up. Silent Property – MSDN
The next instruction tells IE to navigate to the Url provided.
The 4th line of this script fragment is interesting. We need to wait for IE to actually do the navigation. If we don’t add this line, the PowerShell script will happily continue executing much faster than IE will retrieve and load the page into the Document Object Model (DOM) and the rest of your script will probably fail.
After IE has loaded up the DOM, we can now find our elements, give them values, and click the Submit button.
$doc = $ie.Document
$doc.getElementsByTagName("input") | % {
    if ($_.id -ne $null){
        if ($_.id.Contains($buttonIdFragment)) { $btn = $_ }
        if ($_.id.Contains($acceptTermsInputFragment)) { $at = $_ }
        if ($_.id.Contains($passwordIdFragment)) { $pwd = $_ }
        if ($_.id.Contains($userIdFragment)) { $user = $_ }
    }
}

$user.value = "<user name here>"
$pwd.value = "<password here>"
$at.checked = "checked"
$btn.disabled = $false
$btn.click()
Write-Verbose "Login Complete"
One interesting thing about IE automation is that any JavaScript or page behaviours that we would expect to execute don’t seem to run, so we need to explicitly enable the submit button in the event that it was not enabled until all of the fields were entered and the accept terms of use checkbox was clicked.
And that’s it! I now have a PowerShell script that runs in seconds and logs me into the client’s guest WiFi network.

As a final task, I took the code in my Login-GuestWifi.ps1, converted it to a function and placed it in my ./profile.ps1 file that gets invoked any time a PowerShell session is started on my machine.
It should be noted that the UserName and Password, in my case, were not secured in any fashion other than being only physically stored on my machine in my scripts file. I never checked my credentials into source control and I had no need to put them anywhere else. If needed, I could secure them but that wasn’t necessary. These are not domain credentials and are only giving people access to the guest WiFi network.
Final Thoughts
My goal with this post was to exposed you to the idea of using PowerShell to automate simple web-based tasks in Internet Explorer. I’ve recently been using PowerShell a lot and I’ve just been continuously impressed with how powerful it is. So go give it a try!
Storing Secrets In Azure Guest Post on Canadian Developer Connection Blog
I was recently asked to contribute to the Microsoft Canadian Developer Connection blog and the post has gone live! This post details how to Store Your Secrets in an Azure Websites App Settings! Go check it out!
Calculating Lead Time for Work Items on TFS 201x
This is part 2 of a series of posts that show how we can model virtual kanban systems on TFS 201x.
If you didn’t read part 1, I would recommend that you start there.
Big gotcha with regard to this blog post
You cannot access the TFS data warehouse (which we will need to do) using Visual Studio Online and as far as I know, there is no way to access the data stored there in any way yet. As such, this post will make the assumption that you are using TFS 201x on-premise and can access the TFS Data Warehouse.
Assumptions
Same assumptions from part 1 apply and I’ll re-iterate them here along with a few other assumptions.
- You are a TFS user and will understand the features that I’m using.
- You have a basic understanding of TFS Process Templates
- You have a basic understanding of the Iteration Path hierarchical work item field that is present in the various Process Templates
- A basic understanding of virtual kanban systems as they pertain to software development
- NEW – You have a basic understand of how TFS Work Item States work
- NEW – You have a working knowledge of Excel 2010+
- We’ll be connecting to databases and programming in VBA
Quick Review
Just as a quick review, here is the current state of our virtual kanban system implementation.

Remember that we are using iteration paths to represent the backlog (uncommitted work) and the kanban system and the only work item state we will be (really) interested in is “Done”.
Calculating Basic Lead Time Metrics
Using the movement of a work item into the kanban system iteration path, until it gets to a “Done” state, we can now calculate the lead time for that item. The easiest way I’ve seen to do these analysis, after your kanban system has been setup and running for a while, is to use Excel to consume and analyze TFS data warehouse data about work item changes.
Developer Ribbon in Excel
The first thing we need to do is turn on the Developer Ribbon in Excel. After you’ve started Excel (I’m using 2013), right click on the ribbon and select the Customize the Ribbon option.

Turn on the Developer tab by checking the box and pressing OK.

Prepping the Spreadsheet
For this exercise, I like to create three sheets in my Excel workbook.
- Parameters
- LeadTimeReport
- Data

We will refer to the names of these sheets in our Excel VBA code.
Getting Data From TFS
Excel has the functionality to connect to easily connect to SQL Server databases and that is exactly where TFS stores all of it’s data. TFS stores the data that we are interested in in a database that is called Tfs_Warehouse.
Navigate to the Data tab on your spreadsheet and put the caret on cell A1.
Now create a connection to Tfs_Warehouse by visiting the Data tab, clicking the From Other Sources button and selecting From SQL Server.

Enter the name of the database server that is the backend for your TFS installation and use the appropriate credentials (SSO or SQL Server account) in the connection dialog and click Next.

Note – You will need to able to access the server with either your domain account permissions or a SQL Server account that has permissions to access Tfs_Warehouse database.
Select the Tfs_Warehouse database on the server and the DimWorkItem table and click Next.

Change the name of the connection to something more friendly like LeadTimeConnection.odc and set the friendly name to something more descriptive and click Finish.

An Import Dialog will pop open once you have hit Finish. Select the Properties button on this dialog.

On the Properties dialog, click the Definition tab and then change the Command Type to SQL and enter the SQL statement below in the Command Text textbox and press OK.

SELECT system_id, system_title, system_state, di.iterationpath, system_changeddate, System_WorkItemType
FROM dimworkitem dw
INNER JOIN dimiteration di
ON dw.iterationsk = di.iterationsk
Now press OK on the Import dialog and you should now see the Data sheet fill up with data from your TFS database.

VBA Magic to the Rescue
Now that we have our work item data coming, we need to do a couple things:
- Narrow it down to the time period under review
- Determine what started and finished within that time period
- Calculate the Lead Time for the items that completed during this period
Caveat – I’m not a VBA Script writer by trade! I’m fairly certain there could be better ways to write this code, but since writing elegant VBA code is not my objective, I’ll just get you to the lead times. If you have any suggestions on how to better code this out, I’d love to hear from you.
Create a VBA Module
On the Developer tab, click the Visual Basic button to get to the VBA IDE.

Once you are in the Visual Basic editor, create a new module for holding your code by right-clicking on the Module node of the tree and inserting a new Module.

Now we can just start entering all of the code from below.
Declare String Constants in the Module
Public paramSheet As String
Public reportSheet As String
Public dataSheet As String
Public connectionName As String
Public backlogIterationPath As String
Public kanbanSystemIterationPath As String
Public startState As String
Public endState As String
These strings (global) allow us to do set our sheet names and change the iteration paths that we use to model our kanban system.
Determine Vertical Range of Data
Private Function VerticalRange()

Sheets(dataSheet).Activate
Range("B1").Select

Dim height As Integer
height = 0

Do While ActiveCell.Value <> ""
    height = height + 1
    ActiveCell.Offset(1, 0).Activate
Loop
VerticalRange = height

End Function
Private Function VerticalRange() Sheets(dataSheet).Activate Range("B1").Select Dim height As Integer height = 0 Do While ActiveCell.Value <> "" height = height + 1 ActiveCell.Offset(1, 0).Activate Loop VerticalRange = height End Function
This code needs to discover the length of the data set that we’re processing. This function does that.
Create Lead Time Generation Function
Private Sub GetLeadTime(ByVal rows)

Dim sourceRowCount As Integer
Dim targetRowCount As Integer
targetRowCount = 2

Dim sws As Worksheet
Dim tws As Worksheet
Set sws = ThisWorkbook.Sheets(dataSheet)
Set tws = ThisWorkbook.Sheets(reportSheet)

Dim workitemid, firstRow, lastRow, nextFirstRow As Integer
firstRow = 2

For sourceRowCount = 3 To rows
     workitemid = sws.Range("A" + CStr(firstRow)).Value
     Dim wiD As String
     wiD = sws.Range("A" + CStr(sourceRowCount)).Value

     If wiD = workitemid Then
        'skip if true – we are looking for the last row for the current work item
     Else
        lastRow = sourceRowCount - 1
        nextFirstRow = sourceRowCount

        Dim isUncommittedBacklog, isKanbanSystemBacklog, isUncommittedNew, isKanbanSystemNew, isDone As Boolean
        Dim uncommittedBacklog, kanbanSystemBacklog As String
        Dim uncommittedBacklogFound, kanbanSystemBacklogFound As Boolean
        Dim startDate, endDate As String

        For rowNum = firstRow To lastRow
            isUncommittedBacklog = InStr(1, sws.Range("D" + CStr(rowNum)).Value, backlogIterationPath, vbTextCompare) > 0
                If isUncommittedBacklog = True Then
                    isUncommittedNew = InStr(1, sws.Range("C" + CStr(rowNum)).Value, startState, vbTextCompare) > 0

                    If isUncommittedNew = True Then
                       uncommittedBacklogFound = True
                    End If
                End If

            isKanbanSystemBacklog = InStr(1, sws.Range("D" + CStr(rowNum)).Value, kanbanSystemIterationPath, vbTextCompare) > 0

            If isKanbanSystemBacklog = True And uncommittedBacklogFound = True Then
                isKanbanSystemNew = InStr(1, sws.Range("C" + CStr(rowNum)).Value, startState, vbTextCompare) > 0

                If isKanbanSystemNew = True Then
                   kanbanSystemBacklogFound = True
                   startDate = sws.Range("E" + CStr(rowNum)).Value
                End If
            End If

            If kanbanSystemBacklogFound = True And uncommittedBacklogFound = True Then
                isDone = InStr(1, sws.Range("C" + CStr(rowNum)).Value, endState, vbTextCompare) > 0
                If isDone = True Then
                    endDate = sws.Range("E" + CStr(rowNum)).Value
                End If
            End If
        Next rowNum

        'Calculate Lead Time
        If IsDate(startDate) And IsDate(endDate) Then
            Dim leadTime As Integer
            leadTime = DateDiff("D", startDate, endDate)
            tws.Range("A" + CStr(targetRowCount)).Value = sws.Range("A" + CStr(lastRow)).Value
            tws.Range("B" + CStr(targetRowCount)).Value = sws.Range("B" + CStr(lastRow)).Value
            tws.Range("C" + CStr(targetRowCount)).Value = leadTime
            targetRowCount = targetRowCount + 1
            startDate = ""
            endDate = ""
        End If

        firstRow = nextFirstRow
        nextFirstRow = 0
    End If
Next sourceRowCount

End Sub
This code is pretty messy but isn’t actually very complicated. What happens in this function is that we go through each row of the source data set and look for the work item entering the kanban system iteration path. We then look for the work item getting to the done state.
If a Start Date and and End Date are discovered for the work item, we make an entry in the LeadTimeReport sheet with the calculated Lead Time. If we do not find those dates, no entry is made.
You can step through the code in the IDE using F8 to step through each line of the function.
Create Public Access and Initialization Function
Public Sub GenerateReport()

'constants in module
paramSheet = "Parameters"
reportSheet = "LeadTimeReport"
dataSheet = "Data"
connectionName = "LeadTimeConnection"
backlogIterationPath = "\Tailspin Toys\Iteration 1"
kanbanSystemIterationPath = "\Tailspin Toys\Iteration 1"
startState = "Active"
endState = "Closed"

Dim startPeriod, endPeriod As Date
startPeriod = ThisWorkbook.Sheets(paramSheet).startDatePicker.Value
endPeriod = ThisWorkbook.Sheets(paramSheet).endDatePicker.Value

Dim cmdText, periodDates As String
cmdText = ThisWorkbook.Connections(connectionName).OLEDBConnection.CommandText
periodDates = " Where system_changeddate between '" + CStr(startPeriod) + "' and '" + CStr(endPeriod) + "' and System_WorkItemType = 'User Story' Order by system_id , system_changedDate asc"

Dim location As Integer
location = InStr(1, cmdText, "where", vbTextCompare)

If location > 0 Then
    cmdText = Left(cmdText, location - 1)
End If

ThisWorkbook.Connections(connectionName).OLEDBConnection.CommandText = cmdText + periodDates
ThisWorkbook.Connections(connectionName).Refresh

Call GetLeadTime(VerticalRange)

End Sub
Public Sub GenerateReport() 'constants in module paramSheet = "Parameters" reportSheet = "LeadTimeReport" dataSheet = "Data" connectionName = "LeadTimeConnection" backlogIterationPath = "\Tailspin Toys\Iteration 1" kanbanSystemIterationPath = "\Tailspin Toys\Iteration 1" startState = "Active" endState = "Closed" Dim startPeriod, endPeriod As Date startPeriod = ThisWorkbook.Sheets(paramSheet).startDatePicker.Value endPeriod = ThisWorkbook.Sheets(paramSheet).endDatePicker.Value Dim cmdText, periodDates As String cmdText = ThisWorkbook.Connections(connectionName).OLEDBConnection.CommandText periodDates = " Where system_changeddate between '" + CStr(startPeriod) + "' and '" + CStr(endPeriod) + "' and System_WorkItemType = 'User Story' Order by system_id , system_changedDate asc" Dim location As Integer location = InStr(1, cmdText, "where", vbTextCompare) If location > 0 Then cmdText = Left(cmdText, location - 1) End If ThisWorkbook.Connections(connectionName).OLEDBConnection.CommandText = cmdText + periodDates ThisWorkbook.Connections(connectionName).Refresh Call GetLeadTime(VerticalRange) End Sub
This code is the function that is going to be invoked by the button we put on our parameters sheet. It sets all of the global values for the module, acquires the start and end date of the period under observation, modifies the command text of the SQL query to use the dates in the query,
Create UI
Now that the module has been created that does all of the data transformation work, we need a simple UI that allows us to pick a Start Date and an End Date for the period under observation and a button to kick the whole thing off.
After you have selected the Parameters worksheet, in cell A4 type out “Start Date”. In cell A6 type out “End Date”. And finally on B3 put “Period under Observation”. These are labels for our UI.
Now on the Developer tab, click the Design Mode icon on the ribbon. Now we can Insert 2 Date Picker controls onto the worksheet. Click the Insert icon on the ribbon and then click the the very last icon on the bottom right.

In the More Controls dialog that comes up, select the Microsoft Date and Time Picker Control 6.0 (SP4) and then click OK. You will now be able to “draw” out the new control on the worksheet. Draw out the first control roughly on cell B4. In the Excel Name Box, name the control startDatePicker.

Repeat the process for the second date time control and draw the second control roughly out on B6. In the Excel Name Box, name the control endDatePicker. These names are used in the script to find the range parameters.
Now we need to add a button. Click the Insert icon again and select the first icon on the top left and draw out a button roughly on cell Here is what it should look like when complete.

Generating Lead Time Data
We should have completed all of the steps required to generate lead time data for the kanban system that we’ve model in Part 1 of this series of blog posts!
If you press the buttons and everything has been typed in correctly, you should see data populate the LeadTimeReport worksheet. This will look roughly like this.

You can format the first row of the LeadTimeReport sheet however you see fit. If you want to add more rows of labels, you will need to edit the scripts as they start adding lead time entries on row 2.
I’d like to point out that in this case, I’m using the Brian Keller ALM VM for Visual Studio 2013.4 and the Fabrikam Team Project inside of that VM for data. You will need to change the script to reflect the iteration paths that you are using your kanban system in TFS.
Final Thoughts
This has been a fairly long and detailed post and I hope that you’ve been able to follow it and get the lead time data generation working in your environment.
There are more sophisticated ways of generating this lead time data (programmatically more advanced applications). The reason I wanted to use Excel and Visual Basic was to allow anyone to generate lead time data with the basic tools that are available in a normal IT shop that uses TFS. If you’d like to expand on this approach and develop an application that does this (which I have already done elsewhere), I hope that you can use this example as a guide to what you’ll need to do to write your application.
Thanks and I hope to hear from you in the comments soon. Let me know if this worked for you or how I can make this example better.
Modeling your kanban system on TFS 201x using Iteration Paths
Microsoft has been making some great strides in adding features to Team Foundation Server (TFS) that allow for the modeling of the virtual kanban system that your teams might be using to manage their work. The web access kanban boards and the ability to manage WIP limits on the boards are two such features.
Kanban tooling is still relatively new to Microsoft and they are trying to adapt a product/approach that has historically been very well suited to Scrum and Traditional work management techniques, and so it isn’t much of a surprise that we need to tweak the way that we use TFS 201x to help us correctly model our virtual kanban systems. To that end, we need to take advantage of a few of the features in TFS to allow our teams to be more effective when using kanban.
This is the first in a series of blog posts detailing how we can model kanban systems on TFS.
Assumptions
I have several TFS related assumptions that I’m making as you read this post:
- You are a TFS user and will understand the features that I’m using.
- You have a basic understanding of TFS Process Templates
- You have a basic understanding of the Iteration Path hierarchical work item field that is present in the various Process Templates
- A basic understanding of virtual kanban systems as they pertain to software development
Iterations vs. Iteration-less Planning
The first challenge that we’ll encounter when using TFS is that there is no specific kanban process template, which is actually the right approach in my opinion. It would be tremendously difficult to create a one-size-fits-all kanban process template and I think we need to get into the habit of customizing our process templates if we’re going to be using kanban work management techniques. That said, we still need to be able to have an ability to plan in an iteration-less environment.
This is where we get a bit confusing with the features we use in TFS vs. our intent, but it will work for us.
TFS uses the Iteration Path structure to determine what is on the Product Backlog board in web access. The Product Backlog board is the current feature in TFS to visualize our kanban system so we would like it to represent things in a more traditional kanban way. In order to do this, we need to modify the Iteration Path structure and communicate with our team how it is intended to be used. This means that we need to communicate that we are using the TFS feature named Iteration Path for something other than an iteration as it would be commonly understood if we were using a Scrum work management approach.
Here we find a model of a simple kanban system.

We have an uncommitted backlog of options or ideas that we may or may not eventually work on. We have a Ready Queue which is the work we have committed to doing next, we have a Doing column that represents the actual development work and a Done column that represents that we have finished some piece of work.
Understanding Lead Time
One of the primary reasons that we need to doing all of this is so that we can calculate a lead time for our work items, which TFS 201x currently does not do for us and the way that the kanban boards are currently implemented, we cannot access the data that is captured by the kanban boards. (Product Group call out here: We want access to that data!) Lead-time is a basic and fundamental metric for measuring the performance of work through a kanban system and so we kind of need to be able to generate that information.
When you want to capture lead time data for work items, we need to identify the start and finish line for the work. Done is fairly universally recognized as the finish line, but the start line is a little harder to define sometimes. In this kanban system example, we are going to state that Uncommitted work is not a part of the lead time calculation but when we move work into the Ready Queue for the team to pull from next, the lead time period has been determined to have started.

One of the current challenges with TFS is that lead-time is perceived to have started when a card appears on the board and the cards appear on the board as soon as it is placed into the Product Backlog iteration.
Another challenge is that all work items (uncommitted or committed) may appear on the kanban boards if the work item is placed in the Iteration Path that has been identified as the Product Backlog in TFS.
To this end, with this simple workflow, we are going to use the Iteration Path feature and create an Uncommitted backlog and a Kanban System ‘backlog’.
Creating an Iteration Path that is our Uncommitted Backlog
One of the great aspects of TFS is the ease with which you can create or modify Iteration Paths. I’m going to be using Visual Studio Online for demonstration purposes. The Visual Studio Online web interface is the same as the on-premise Team Foundation Server web access interface, so if you have TFS on-premise, you can follow along just the same.
First, we need to go configure our Iteration Path structure. Once you have arrived at your Team Project page on Web Access, you can find the link to make those modifications on the right-hand side of the page.

For simplicity sake, I’ve hidden a couple iteration paths in the Released branch. For now, let’s look at the root node of our Iteration Path structure. Remember that the Iteration Path work item field is a hierarchical data type.

Let’s create an Uncommitted iteration path. Go a head and select the root node in your environment and create a path called “Uncommitted Backlog”. Make sure you are on the root node of your Iteration Path.


In our situation, the dates don’t mean anything to us, but TFS 2013 presents the iterations in this screen ordered by Start Date so we’ll use the dates to “order” our Iteration Paths visually.
Note – In drop-downs on the work items and in Excel, the Iteration Path values will be ordered alphabetically.
Now let’s create our Kanban System Iteration Path. It should also be a child of the root node and the start date should be 1/2/2012 or one day after the uncommitted backlog’s start date if you chose a different date than I did.

You’re Iteration Path structure should now look like the image above.
There is one more Iteration Path node that we need to create in order for the Web Access Task board to work correctly as well.
On the Kanban System node, create a new child called “Committed”.

Awesome! We have now created an Iteration Path structure that models our virtual kanban system.
Hooking up the Web Access Boards
Now there are two more things that we need to do on the Iterations management screen and that is hook up the two boards we’ll be using in web access to the correct Iteration Path nodes.
First, you need to right-click on the Kanban System node and select the Set as team’s backlog iteration option.

This connects the Kanban System node to the Backlog Kanban board.

Next, click the check-box on the Committed node.

This connects the Committed node to the Task Board in web access.

You might be asking yourself why we have to have the Committed node under the Kanban System node. Well, give it a try if you’d like, but currently, the team’s backlog iteration cannot be the checked iteration that will be shown as the task board.
Reviewing What We’ve Done
Now that we have our kanban system model and a Iteration Path structure that represents that system, we can show how they are intended to map together.

Because the current crop of TFS process templates don’t naturally support modeling virtual kanban systems, we are able to use process template agnostic features of TFS to model our kanban system.
Advantages
So why are we doing all of this you ask? There are several advantages to this particular approach that I like.
- Process Template Agnostic
You can use this technique with any process template that uses the TFS Iteration Path work item field. - Iteration Path based Lead Time boundaries
Currently, most teams will try (want) to use the kanban board columns but because the data is not accessible, we can’t. Other teams will model their kanban system with Work Item States, but this tends to become a mess as Work Item Template modifications need to be done on a lot of work items and frequently. This is just a PITA, especially if you don’t have TFS administration skills in-house and rely on consultants to help with process template modifications.By using membership in an Iteration Path as the means to determine when something has entered (and/or left) a lead time boundary, we free ourselves from having to use work item states as a means of creating these lead time boundaries. - Clean Up Our Queues
One of the things we want is concise, useful queues (and queue visualizations) in any tool, including Excel, Visual Studio or the web access. Currently, web access will limit the # of work items it presents in the queues, but users of Excel or Team Explorer will get potentially long and confusing lists of things to review. While our Uncommitted queue may be (and usually is) quite long, the daily working queues and the kanban system can be made smaller and more concise. This aids planning and decision making about what to prioritize and pull daily. - Works on TFS 2010
This technique will work on TFS 2010. We won’t get the nice web access boards, but as we’ll see in follow-up posts in this series, there is still value in using this technique to capture lead time for work items.
Disadvantages
There are a couple disadvantages. They include:
- Can’t determine cycle time easily
Cycle time is the time between two arbitrary states in your kanban system. Using our example kanban system, I would say that cycle time of the Doing column might be 2 days, but the lead time of the entire system is 4 days. I don’t think that I would encourage my teams to use this Iteration Path technique to model individual columns. - Non-Intuitive
I don’t think that this technique is natural to the VS community at large. I think it works and is a novel way of modeling kanban on TFS, but there needs to be education about how the team (and upstream and downstream partners) are using TFS.
Final Thoughts
Hopefully this have given you some ideas on how to better model virtual kanban systems in TFS. Virtual kanban systems are a tremendously valuable means to manage work, and even though TFS doesn’t currently support them in a intuitive manner, we can still use many of the features in TFS to achieve our goals. You could also use these techniques in similar fashion in non-kanban environments, if you simply want to clean up or better manager your queues.
In the next part of this series, I will show how we take advantage of this technique to calculate lead-times from your work item data.
As always, I would love to hear your thoughts or answer your questions.
LeanKanban United Kingdom 2013 Video up
Hello everyone,
Just wanted to point out that the Lean Kanban United Kingdom videos are all up! Check out my talk on Myths and Misconceptions about the Kanban Method in addition to all the other great talks from this conference.
http://www.youtube.com/watch?v=-9vLfEz4aqY&list=PLVsUnwOzPqiRZ2cnrzfKFnDEDTqL3pr5-&index=28
You can find a lot more information on the LeanKanban Conference series here.
I hope you all have Happy Holidays and a Prosperous 2014!!
Cheers,
Dave
The Agile Manifesto is NOT a Buffet
I’ve recently stumbled upon two blog posts that got me thinking about agile adoptions and why they might fail (not in a safe way).
First there was this post that I saw because it resonated with a colleague and he shared it.
http://inline-lambda.blogspot.ca/2013/11/agile-b2b-and-beta-conundrum.html
I don’t know Guillaume and I’m sure he is a very nice guy, but the post struck me as from someone who didn’t understand the Agile Manifesto and was confusing it with the prescriptive guidance in the Scrum Guide or the guidance of The Lean Startup.
And then I saw a post from my friend Dylan Smith starting a blog series about “Why Does Agile Fail”.
As I was reading these two posts, I started asking myself Why are these authors making these statements? Why are they observing these effects? The way that I’ve understood the Agile Manifesto and its intent, you shouldn’t see these effects, at least not for very long. It struck me though that this is a story that I hear over and over again.
Then I had a light bulb moment.
We often talk about an “Agile Buffet” as a set of tactics or practices we can pull from and use as best fits within our organization. I like this. As a passionate Kanban Method practitioner, the idea that we’ll continuously discover problems opportunities for improvement and that we’d want to leverage past industrial learning is a core philosophy for me. But the Agile Manifesto is NOT a buffet. We should not pick and choose which of the values and principles that we will follow and aspire to. They are all necessary ways of thinking if we’re going to pull our industry out of the dark ages.
Now I am not suggesting we shouldn’t be finding the best way to, in context, live up to those values and principles. We should be very disciplined in What we pull from the Agile Buffet and When we pull the improvement. This is where a Kanban Method approach to continuous improvement is enormously beneficial. With a functioning kanban system, we have data that allows us to make informed, economically sound decisions about improvements and a mindset that we are going to improve incrementally and in an evolutionary manner. We are actually slaying a software development dragon with a 1-2 punch of Agile Manifesto thinking and Kanban Method thinking. We’ve got something guiding us towards what a successful software development team would behave like (Agile Manifesto) and we’ve got something showing us how to get to that goal in a humane, intelligent, and economic manner (Kanban Method).
Final Thoughts
I would like to encourage you to go read the Agile Manifesto again and to go read about The Kanban Method. They won’t tell you how to do things, but they are telling you what you should aspire to do. Now with that in mind, go and look at the Agile Buffet. Read the Scrum Guide. Read the kanban blue book as well as look at case studies from teams that have used the Kanban Method. This is your buffet of tactics that can help you solve your problems. Start pulling from this buffet of industrial learning. Develop a capability to understand what works for you and perhaps more importantly what doesn’t.
But please remember, these value systems are not a buffet and you don’t get to pick and choose from the values and principles they provide.
The Kanban Method Is A Vehicle – It Is Not A Destination
Wow! I just got back from #Agile2013 in Nashville and I have to say it was a great experience and my brain is overflowing with ideas! Which is always good for blogging. ![]()
One of the things that occurred to me while I was there was the seeming surge in the competitiveness amongst methodology practitioners. There were numerous tweets and blogs, sessions and conversations all discussing the pros and cons of one method versus another. Here are just a few things that I’ve seen… (FYI, I pick on everyone equally. Let’s call it an evolutionary fitness test.)
http://kenschwaber.wordpress.com/2013/08/06/unsafe-at-any-speed/
http://www.netobjectives.com/blogs/why-net-objectives-supports-scaled-agile-framework-safe
https://twitter.com/jetpack/status/363442750600921088
http://www.djaa.com/kanban-alternative-path-agility
http://www.djaa.com/kanban-anti-safe-almost-decade-already
So we have a lot of posturing and positioning, and I actually don’t mind that. With noise comes interest, with interest and curiosity comes exploration and learning, and we can all grow. I hope though that by reading this blog and the other blogs and by exploring the topic, you gain a greater understanding of the items under discussion. It was with this intent that I had a really good conversation (or two) with Al Shalloway and Nayan Hajratwala about SAFe and the current thinking about The Kanban Method and Kanban/kanban in general.
So we were hearing the noise, exploring the enemy, probing for weaknesses and then trying to sway the enemy to our side. ;P
Today I had a realization about the experience. I learned about SAFe. I learned more about Scrum. I expanded my own understanding of The Kanban Method and kanban in general and I discovered more refinements to my thoughts when having this conversation! The Kanban Method, as David has been saying and said in the post above, is not the enemy of SAFe or Scrum or any other practices-based methodology that is a manifestation of the Agile Manifesto. It isn’t even comparable. It isn’t an Agile-practices based methodology at all, which is why David (and many of us at LKU) have been saying that The Kanban Method isn’t an Agile methodology! It is the vehicle that GETS you to Agile, wherever that may be for you! It is the vehicle that you use to encourage a collection of weird-acting individuals (people in an organization) to do something, such as adopt a bunch of agile-influenced tactics that might be described within any of the other practices-based methodologies!
Let me draw a picture!

We all start on these process adoption/organization transformation/improvement initiatives from a current state. Very often we can’t even describe the current state, but that is where we are. And very often, we can’t accurately describe the desired end-state, but let’s suggest for a moment that we can. So we know where we are (maybe) and we know where we want to go (maybe) but how to get there?!?! Some folks would have you believe you can jump there by telling the organization to put something in place.

I don’t mean to pick on Scrum. I like Scrum when it is the right fit. But it is frequently adopted blindly and prescriptively because it provides a lot of guidance on specific practices. But what if Scrum doesn’t fit? (Are there any DevOps people reading?) What if Scrum doesn’t help with the capability that you’re interested in? Or what if you’re problem is a scaling it out problem, which Scrum has troubles with. Good news! SAFe is right around the corner!! And virtual kanban systems! And Random Acts are there too!!

These are all methodologies with some great tactics to use for organization improvement right?! If you just tell everyone to do Scrum, SAFe, virtual kanban, or random stuff (heros, cowboys and smart people), we’ll achieve the improvements we’ve been struggling to get for the last 50 years in our industry!! But I heard this awesome comment from Linda Rising at #Agile2013 during her talk. I forgot to attribute it to her in my tweet though!
This is part of the problem with prescriptive approaches to process adoption. And unfortunately, Scrum and SAFe as described are easily prescribed. I’d even venture to state that the authors and evangelists of these methods want them prescribed. “If you do this, everything will be ok.” Of course they will not admit that they want you to blindly adopt all of the tactics, but in my opinion, the way those methodologies are described and evangelized, that is how it works out in the end.
And never mind that we still don’t really know if the methodology that we’ve selected will get us to the desired improvement given the context in which we are applying the methodology! Do the people in your organization want Scrum? SAFe? virtual kanban systems? Will they be able to pick up all the necessary practices? Apply them properly? Will the organization have the maturity to get through the hard parts? What if you’ve picked the wrong method? And what if the actual end-state option that you need isn’t the one you thought you needed at the start?

Has this happened to you? Have you seen this happen?
I want to reiterate at this point, I don’t think that the practices and tactics described in Scrum are bad. I don’t think SAFe tactics are inherently bad. I don’t think that “Kanban is so easy” crowd (proto-kanban or basic virtual kanban systems) are bad. It’s just going to be harder, longer, and more costly to get to an end-improvement than it should have been. You’re increasing the chance of your improvement initiative being interpreted as a failure, or being aborted early. Or leaving improvements undiscovered!
Another thing that I think is really interesting is that most of the practices-based methodologies describe themselves as an end-state. Like there is no more to learn and no more reason to grow in your context. What if the discovered end-state is a healthy, functioning Scrum implementation. Is that the end? Is there no where else to improve? What guidance does Scrum give you if you find an improvement that is counter to a described Scrum tactic? Or SAFe for that matter? Should we have end-states?

I think we are far better served trying to create an organizational capability to identify improvement opportunities and use any/all available tactics that we think will move us towards the desired improvement, once we know what the specific problem is. I think we are better served by creating an organizational capability to understand the attributes of the work that we do (volume, frequency, size, complexity) and understand the capability of the organization to execute that work. And I think that we are better served by facilitating the creation of a kaizen culture within the organization that will continuously seek out opportunities to improve because then the people own the problem and the improvement!
I want a vehicle to get me to my currently planned destination!! I want to be able to make informed decisions and change the destination! I want all my peers to dynamically guide their team to the next improvement that is discovered in the context of doing the work! And I don’t want to limit my destinations! I want to know that I’m making progress!
So we know you’re organization is ‘here’! Sounds silly when you say it that way but even if you can’t describe it, you are where you are. And there is some value in describing where you are because it will make progress measurable and discrete instead of abstract or qualitative. And we know that we need to be… faster let’s say. It should be more elaborate than that but bear with me for a moment. Now we have to convince everyone involved to paddle in the same direction!
What can I use to do that? Will Unit testing help? Will team structures help? continuous delivery? project roll-up techniques? Will any of these specific practices help me create an environment that causes groups of people to understand the problem, understand the capability, formulate a plan to improve and then determine if the execution worked? I do not think so. Are they all good things? YES! Unequivocally! Are they good things for everyone? All the time? No.
The Kanban Method will foster these capabilities for you because that is what it is designed to do. It is not designed to make you code faster or with higher quality. It will help you understand the cost of poor quality and then allow you to experiment with quality improving tactics like Unit testing/TDD/ATDD/BDD/xDD. Will it help you deploy your application faster or sell more units of your product? No, you have to use tools or LeanStartup for those kinds of things! Will it help you create a kaizen culture within an organization? Yes, because that is what it is designed to do. Will The Kanban Method encourage you to adopt concrete practices from any other methodology? Yes. Can you use a SAFe tactic if it seems logical in your context? Yes! Scrum tactic? Yes! virtual kanban system? Absolutely!
Final Thoughts
I keep coming back to something that my friend Frank Vega has said numerous times.
“The greatest learning happens at the boundary of disagreement.”
It was because of the disagreement that Alan Shalloway and I have about how we should guide people that I had these conversations. It was because of the respect and curiosity that we both have that we continue to meet at this boundary.
It think it is important though to be clear and compare like things.
The Kanban Method is not an Agile Manifesto-inspired practices-based methodology like Scrum or SAFe. It is an approach that is intending to create a capability within organizations to do incremental, evolutionary improvement. It is a transition method that understands people and the various factors that cause people to disengage. It is a transition method that provides high-level guidance for the creation or adoption of specific practices in a situation where a problem has been identified. It is a transition methodology that sees no end to the improvement cycle and as such, does not provide guidance on concrete tactics or the order in which you adopt concrete practices.
And because of the opportunistic nature of the culture created by a Kanban Method implementation, all the specific practices that are described by Scrum, SAFe, XP or RUP for that matter, are viable improvement options to specific problems that you may encounter on your journey of continuous improvement.
So get in your vehicle, start improving and go until you hit the horizon!
Latest Posts
-
Getting Docker running on Windows 10
Just a quick post about a couple things I’ve learned yesterday and today. Docker is now available to run on Windows 10. I’m not going…
-

Using PowerShell to Set Your Azure SQL firewall rule
If you’ve read a couple of my recent blog posts, you’ll see that I’ve been working in PowerShell a lot lately. I’ve also been working…
-
Building a TFS 2015 PowerShell Module using Nuget
Update: Unwittingly, I hadn’t tested my Nuget approach on a server with no Visual Studio or TFS installations on it and I’ve missed a couple assemblies…
-
Using IE Automation in PowerShell to Simplify Browser Based Tasks
As a consultant, one of the things that I need to do regularly is log into my client’s WiFi networks. Sometimes this is a once…
